Important Notes
- You should backup your work into a GitHub Repository
- Do not store Godot Project in OneDrive, it breaks them
- Each person should have a folder with their name that all their work goes into
- Only have one person working on a file at a time.
- Only one person should change Project settings
- Only delete and move files from within the Godot FileSystem
Download Godot
Go to godotengine.org

Download the latest version of Godot, make sure that it is the same version as you are using on the school computer.

Extract the zip file.

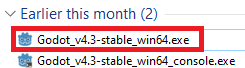
You only Need the wind64.exe file.
Run this.
Create a new Project
You can click +Create to create a new Godot Project.
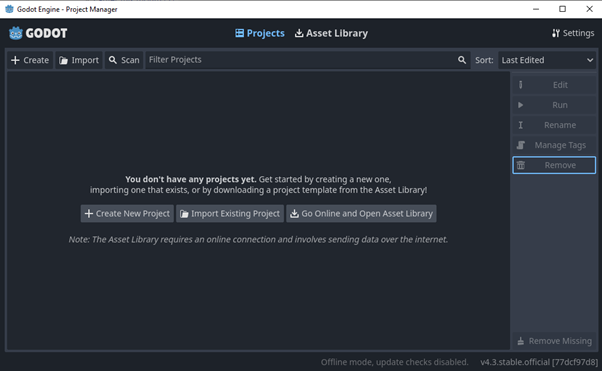
If using GitHub DO NOT PLACE the Project in your OneDrive folder.
Give your Project a name.
Have Create Folder selected.
Click Create & Edit
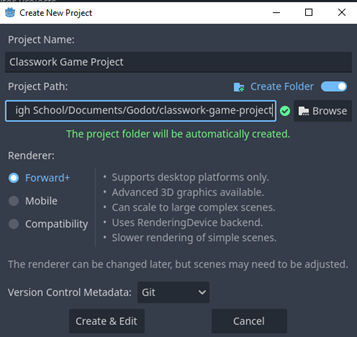
You will now have an empty Godot Project.

What Does a Game Need?
Games should be interactive and fun.
There are multiple different types of games, platformers, 2D, 3D, role playing, racing, shoters, endless runners, etc.
However, there are important features that all games must have.
- Title / Main Menu
- Gameplay / levels
- Win State
- How does the player win or succeed in the game? Completes a task, survives a set amount of time, collects points, kills enemies
- Lose State
- How does the player lose? Time runs our, player dies, loses health, falls, etc/
- What happens when the player loses? does the level reset, display a game over scene, go back to the main menu
- Quit button
Creating our first 3D Game
We will first look at how to create a game with a menu, 3D level, player, win area, win screen, obstacles that kill you and collectables to keep the score.
User Interfaces
Use interface nodes in Godot can be identified by their green colour.

Create a Main Menu
Create a new scene with a User Interface node type.

Double click on the node to rename it.
Name it MainMenu

Press Ctrl+S to save the scene
Create a folder called ui.
Save all of your ui scenes here. This helps keep your Project easy to understand.
Save the main menu scene as main_menu.tscn

You should now see the file in the filesystem in the bottom left.

Now we want to build our main menu.
We will add child nodes to the scene.
Right click to get this pop up menu.

Now open Control and find Label (you can also search for it).
Click Create
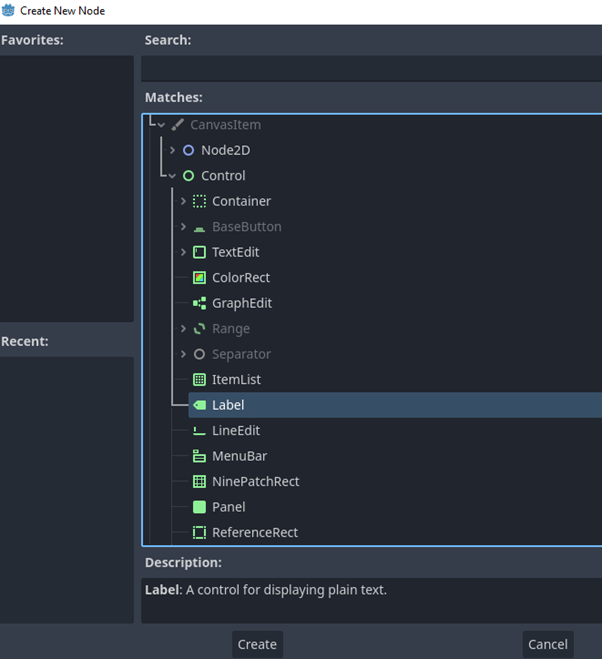
The inspector on the right has all of the properties we can change.
Enter some text for the game. This will be the name of your game.

You’ll notice the text is a bit small and in the top left. We want to move it.
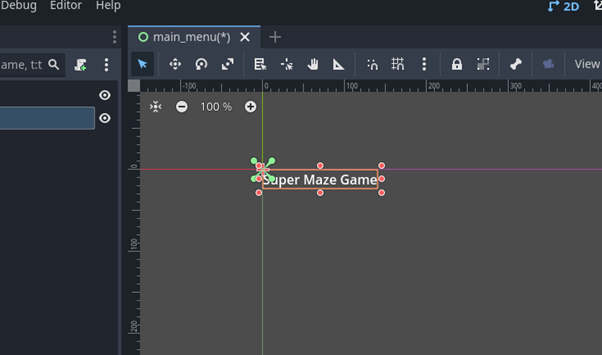
Click the green circle at the top.
You can then choose where to place the item by default.
Placing items from the centre works well for video games as that is where the user will be looking by default.
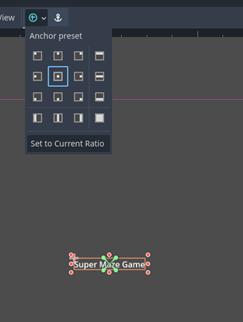
Note that the purple box in the screen is the viewport canvas. This is what can be seen on screen or in the game window.

To change the font size go the inspector and find Theme Overrides.
Then select Font Sizes.
Enter a new font size.

Adding a custom font
The default font is a bit boring.
As Godot is open source it doesn’t come with fonts by default.
We Need to download them and add them to our Project.
First we will make a folder in our Project to store the fonts to keep our Project tidy.
Right click on res in the FileSystem and choose Create New and then Folder…

Name the folder fonts.

Right click on the folder and choose Open in File Manager.
In Godot you can add files from the File Explorer for Windows or Mac.
ONLY DELETE FILES AND FOLDERS FROM WITHIN THE GODOT FileSystem

Google has fonts available.
Go to fonts.google.com
Find a font you like, click on it and then click Get font

Then click Download all

Go to your downloads folder.

Open the file and copy the contents.
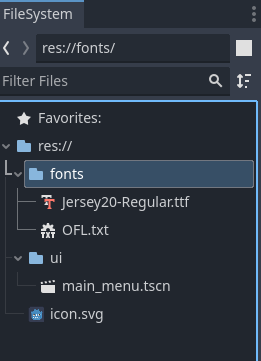
Make sure to take and licence files like the OFL one shown here.

Go to your fonts folder in File Explorer

Paste the files in the folder.

You now have a font that can be used in your game.
You should see these files in the FileSystem in Godot now.
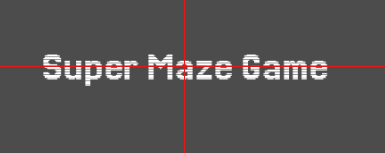
Under Fonts in the inspector click load.

Select the font file to load.

The font should now change.
Adding Colour
Add a node to the scene of type ColourRect

Choose the full rect layout option.

The color rect node now fills the scene.

In the inspector click Color and choose a new colour.

Note that we can’t see out text label.
This is because is is being rendered (drawn) after the text.
We can see the rendering order in the Scene menu.

Move the ColorRect above the Label.
You will now see the text.

We should change the names of these labels.
Change Label to TitleLabel and ColorRect to Background.
Adding Sprites (Images)
We can add sprites to our game.
There is a default one included with every Project called icon.svg
We should make a folder for images.

Create or download any images and place them in this folder. We’ll look at images and sprites in more detail later on.
Make sure to use Copyright free assets or owns you have created yourself.


Add a Sprite2D to the main menu scene.

Rename it.
In the inspector select Texture then load.

Select the image to add.
It will then appear on your scene.
In transform your can move the Sprite around and change it’s scale.

We can Duplicate Nodes by pressing Ctrl + D

Duplicate a Sprite.

It will be in the same location by default.
In order to have the tanks facing each other open offset in the inspector and select Flip H.

You can also directly drag a Sprite onto the scene to add it.

Now we Need a play button.
Add a button node to the scene.

Move and modify this button in the same way you did for the label.
If you hold down Shift while dragging a shape it will only move on one axis x or y.

We now have a main menu scene.
Add a quit button.

We want to get these buttons working.
We will first get the quit button working.
To do this we Need to adda script to the MainMenu scene.
Right click on the root node (MainMenu) and select Attach Script

You will be asked to save the file.
Make sure the file is being saved in the same location as the scene (to make it easier to manage your files).
Now we want to add a signal to the Quit button.
Signals are really important in Godot.
They are used to send information from one node or object to another. We can listen for signals and if another object detects one we can carry out an action.
This could be detecting a button is clicked, the player is hit, we have reached the end of a level, picked up an item, or a timer has run out.
Select the QuitButton

On the right next to the inspector tab select the Node tab.

We are going to add a pressed() signal.
Double click pressed()
Chose which file to attach the signal to.
Make sure that the receiver method has a sensible name.

You will now be taken to the script file.
You will see a Function with the name you entered.

Add the following code as shown on line 15.
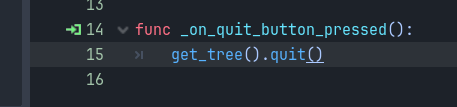
get_tree() get all of the nodes that are running in the game in the form of a tree, it’s like the scene view.

. means do something with the get_tree()
quit() runs the quit Function of get_tree()
Setting Startup Scene
In the FileSystem find the scene that you want to have load when the game starts.
Right click on it and select Set as Main Scene

You can now press F5 or the play button to run the game.
Alternatively you can press F6 to run the currently selected scene.
Run the game.

When you press the quit button it should close the program.
Switching Scenes
Now we want to be able to Switch between scenes in our game.
This will be clicking the play button and loading another scene.
Creating a 3D scene
First we Need to create another scene.
We won’t add anything to the scene yet.
Create a new 3D scene.

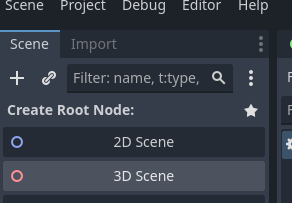
Rename the node to Level and save the scene. You should put this in a levels folder to keep your files tidy.

If you Switch to 3D view there will be an empty scene.
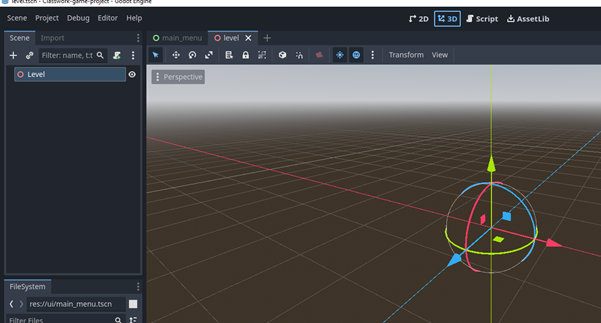
Now Switch back to the main menu scene.
Select the play button and add a pressed() signal.

This code will be slightly different.
Instead of quit() we will use change_scene_to_file() which takes an argument in the form of the path / String of another scene.

The path to the scene will change depending on where you save it

Now when you press the play button you should be taken to a grey scene.


You now have a working menu.
Creating a Level – Environment
Open your empty 3D scene or create a new one.
There are multiple ways of building levels.
This could be using Godot CSG shapes, Blockbench, or Blender to name a few.
We will look at building Prototype levels in Godot using CSG shapes here.
CSG stands for Constructive Solid Geometry we can use it to make shapes.
We will be making a maze in this example.
First we Need to add a floor.
Adding A 3D Node
On the Level select add child node.

Search for CSG and you will see all of the CSG nodes.
Add a CSGBox3D

Rename it to floor.


If you Need to Switch to 3D view

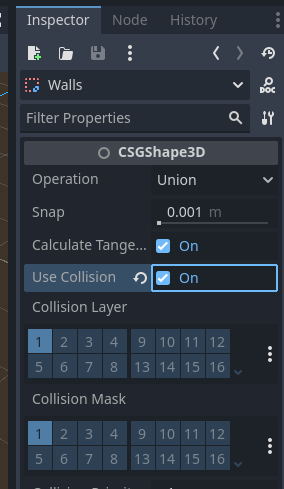
In the inspector tab select use collision
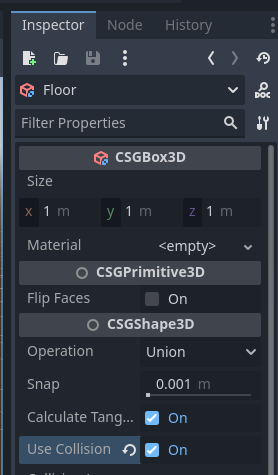
Now we will resize the object. Godot uses 1m units.
X is the horizontal red axis, y is the vertical green axis, and z is the blue forward and back depth axis.

In the inspector find size and change x to 15, y to 0.6 and z to 25.
You should see something like the shape below.
You might Need to zoom out by pulling back on the mouse wheel to adjust the zoom.

Changing Object Colour (Materials)
This looks a bit boring at the moment, so we’ll add some colour.
In the inspector find material and select New StandardMaterial3D

Click on the sphere that appears to see all the properties of the material.
Materials are used to change how objects look in game. We’ll just change its colour here.

To change the colour select Albedo.

Click on the colour and select a new colour for your floor / ground.

Adding Multiple CSG Components to the Maze
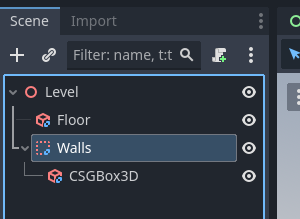
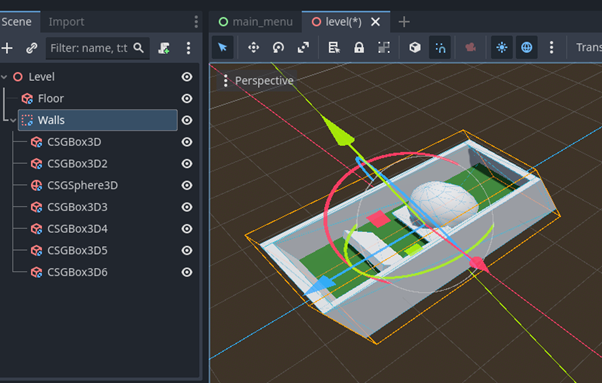
Adda CSG Combiner to the level this allows us to join multiple shapes together.

I have renamed this Walls

Add another CSGBox3D as a child of the Walls (CSGCombiner3D)
You will note that the shape is currently in the floor.

We Need to move it.
You can use any of the arrows to move the shape.
In this Case we want to move the Walls node as this will move everything that is a child of it.
To make it easier to move and line up tools we are going to use the Snap Function.
Click this button, it looks like a magnet in the toolbar at the top.
You can hold down shift while moving to snap the movement to smaller amounts.

Now we can see the node has been moved up on the y (green) axis.
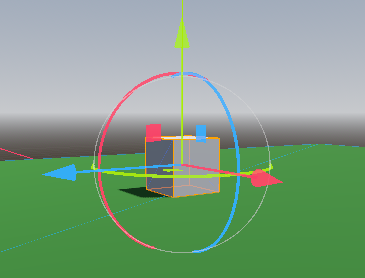
Resize the box.

Add multiple other CSG shapes to create a maze.
You can also press Ctrl + D to duplicate existing nodes.


If you drag the mouse on one of the red, green, or blue rings you can rotate the shape.

When you have finished building your maze / level go to the CSGCombiner3D mode and turn on collision.
This turns on collision for all other child nodes.
Creating a Test Player
We will create a simple 3D player object that used the default controls to test our level.
Create a new scene but select Other node.
Search for CharacterBody3D

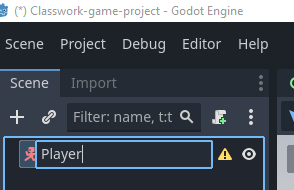
Rename the node Player
Save the scene.
Make a folder player, we will store all the files related to the player here.

The yellow warning triangle tells us there’s a problem. Our Character Need to have a collision shape so that it can detect if it is interacting with anything else.
Adda child node.

Add a CollisionShape3D

We now have a different error triangle. This is because the collision shape doesn’t know what shape its collision should be.

When creating collision shapes we want to keep these simple as it means less mathematical calculations for the program to carry out.
We can add a shape by using the inspector and selecting Shape.
Add a new CapsuleShape

Never use the Transform to change the shape of collision shapes.
Always click on the shape and change its size there.
We won’t change this shape as it’s pretty close for a good human size.

We can’t see our person yet.
Add a Mesh Instance3D to the scene.
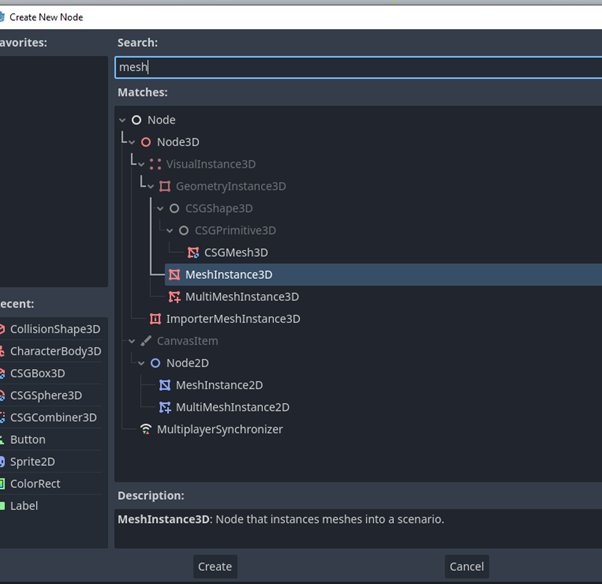

In the inspector under mesh select CapsuleMesh

Add other MeshInstances for Arms and eyes.
Note that the front and back are switched.


You can add materials to the meshes.

Note that if you have duplicated a node this material is applied to both.

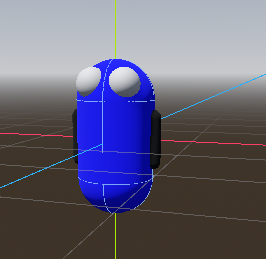
Adding Player Movement Script
Now we Need to add code to move our player.
Right click on the player node and select attach script.
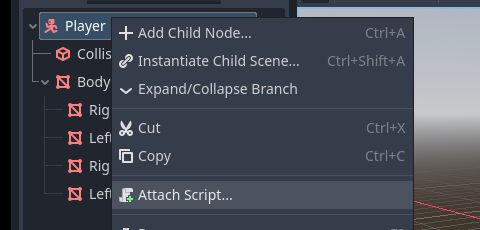
Use the defaults. Make sure the file is saved into the player folder.

If everything has worked correctly you should see a file that looks like this.

This allows you to move the player using the arrow keys and jump with the spacebar.
Adding a Camera
However, we can’t see anything yet as we don’t have a camera setup.
Add a Camera3D as a child of the Player
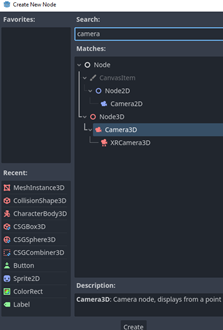
We can see the Camera in the middle of the player.

If we check preview we can see what the camera sees.

Go to View and select Two viewports.
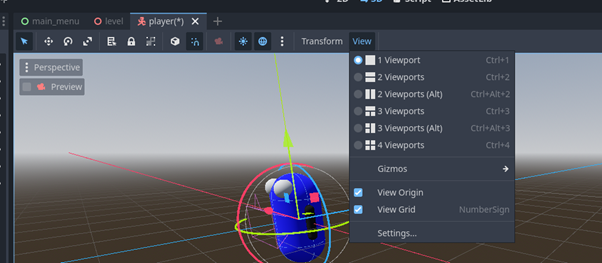
This will allow us to have one view in preview mode and one in the scene to make moving the camera around easier.
Move the camera so that it is above and behind the player.


Ctrl + 1 will Switch back to single viewport.

Adding Player Scene to Level Scene
Make sure that you player is saved.
Switch back to your level scene.
Drag your Player.tscn file from the FileSystem into the level.
Don’t worry about positioning it perfectly yet.

Now select your player and move it so that it is above the floor in the level.
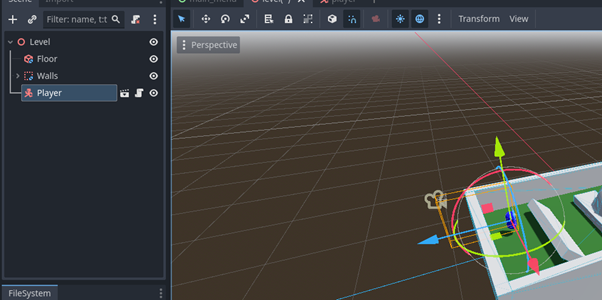
Testing Your Scene
We now have a player with movement on our scene.
We Need to test it.
To test this scene press F6 or press the run current scene button.

You should now be able to move around the level and collide with things.
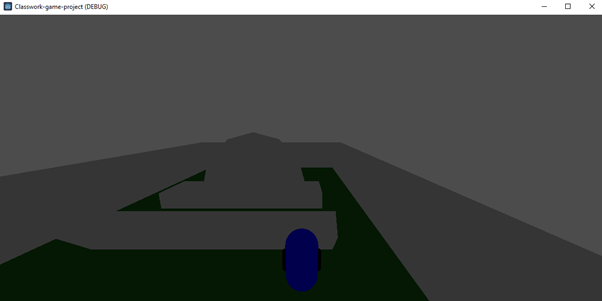
If you fall through the floor or Clip (don’t hit) though wall check that collisions are turned on.

The scene is quite dark so we want to add a light, we will look at lighting in more detail later.
Adding a Light to a scene
Add a node
Search for Light3D
There are three main types of light.
- DirectionalLight3D – Like the sun
- OmniLight3D – Like a light bulb or room light
- SpotLight3D – Like a torch
Add a DirectionalLight3D
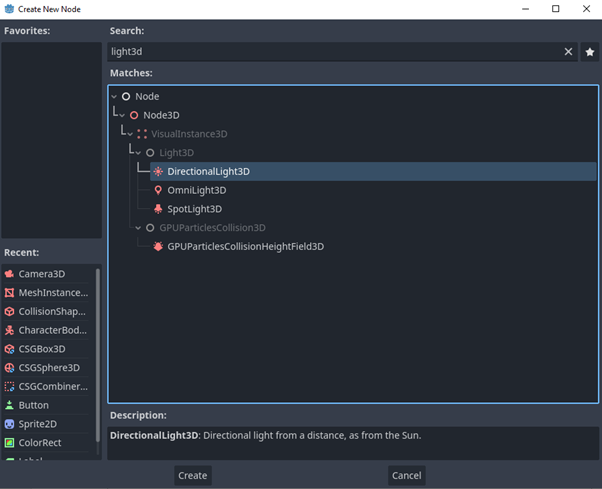
Move the light up and rotate it down to face towards the level.

Add an OmniLight3D and move this somewhere in the level.
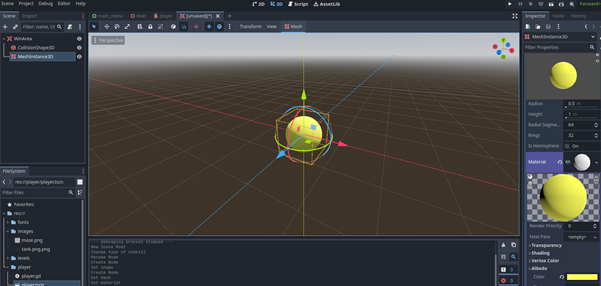
In the inspector we can change the colour, intensity and Range of the light.

Test your level again by pressing F6
Your game should be lit better now.

Testing the Whole Game So Far
You can press F5 to run the game from the default main scene (main menu) we set earlier.
As we had already linked the play button to the level we should now be able to play the game when we click play.
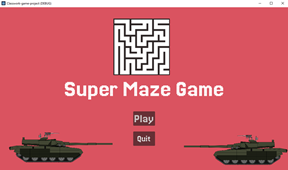

However we can’t end the game by either winning or losing.
Winning the Game
We Need to be able to interact with objects.
This could be to pick up items, detect if something has happened or we have reached an area.
Create a new 3D scene
Change the root node type to Area 3D

Rename the node to WinArea

Add a collisionshape with a Box Shape to the Node

Add a mesh with a material to it, make this a sphere that fits inside the collision shape.
We will make this mesh partially transparent.
In color change the alpha to about 100, this is the transparency.
It won’t make the shape transparent yet.
In Transparency select Alpha.

The shape is not partially transparent.
You can also try out other settings like emission.
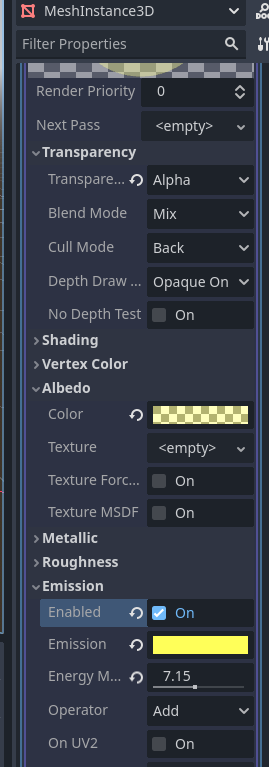
Make sure the scene is saved. This should be in the levels folder.
Area3D objects can detect if something interacts with them by going “inside” their area.
Attach a script onto the WinArea (Area3D) node.

In the Node panel select signals and add the body_entered signal.


Add a print statement as we will test that the signal and area are working.

Now add the win_area scene onto the level scene in the same way that you added the player.
Go back to the level and drag the scene into the level.
Reposition the win area if needed.

Testing the Area3d collision detection
Run the game and move the player into the collision area.
In the console in Godot you should see a message Something is here.
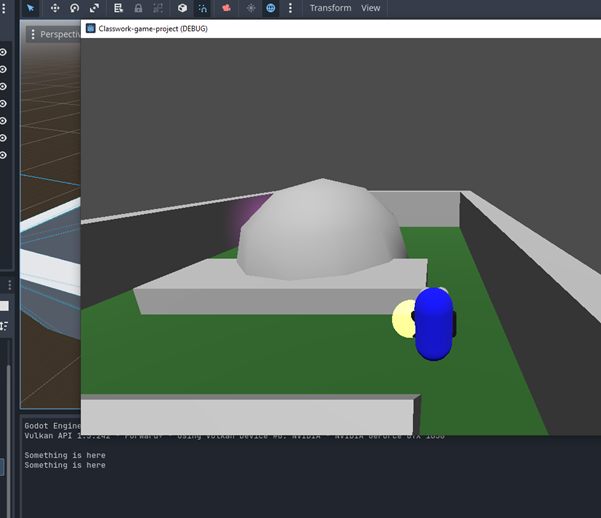
Only Detecting the Player.
At the moment any object that goes into the win area will be detected.
We only want the player to be detected.
To achieve this we Need to add the player to a group.
Open the player scene and select the player root node (CharacterBody3D)

In node select groups.
Type in the group name. In this Case we will use Player. Take care as this will be Case sensitive.
Click Add


Save the scene.
Switch back to the win_area scene.
Go to scripts and select the win_area script.

Delete the print statement.
Enter the code below.
This if statement checks if the body is in the group Player.
Make sure that you have spelled Player exactly as you wrote it in the groups

Now you can see that the player is detected when they enter the area.

Creating a win scene
Now we want to have a scene that the game will change to when the player wins the game by reaching this area.
Create a new User Interface scene.
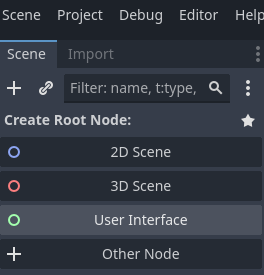
Add a label with the text Winner and two buttons, one for play again and another for main menu.
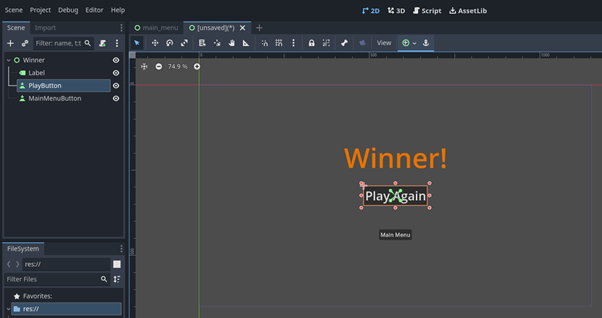
Attach a script to the Winner node for the winner scene.

On the play button add a pressed signal.

As before add code to change the scene to the level.

Now add a signal and code to the MainMenuButton to change the scene to the main menu when pressed.


Now we Need to link up the win area to go to the win scene.
Go to the ain_area.gd script
Find the _on_body_entered Function.
Remove the print statement and replace it with a get_tree and change_scen_to_file call that load the winner scene.
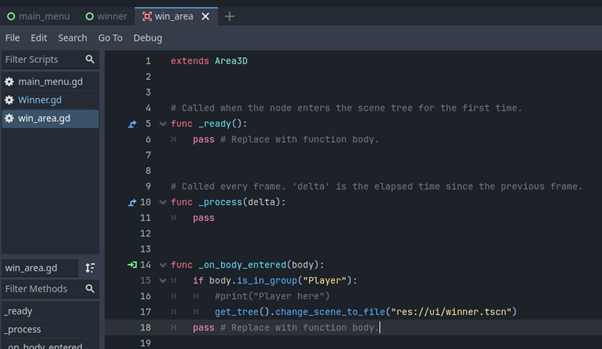
Run the game by pressing F5 and test that the winner scene is loaded when you enter the area.

If it automatically loads you probably haven’t got the is_in_group check working properly.
Obstacles and killing the player
Now we Need to add some challenge.
This will involve adding obstacles that will take the player back to the main menu if they hit us (we’ll add player health later).
Create a new folder items to store the items we will interact with.

Create a new scene of node type Area3D
Add a CollisionShape3D and MeshInstance3D to it. Customise these to how you want them.
Attach / add a script to the Area3D object.

Add a body_entered signal to the Area3D node.

Edit the _on_body_entered Function on the damage area script so that if the body that enters the area is in the player group the game will change to the main menu.

Save the scene and add it to the level.

We can see that there are signals attached as there is the symbol that looks like WiFi next to the name of the node in the Scene tree.

Test the game.

Adding Player Health
Now that our player can detect death we want to make it so that the player has health which can decrease when they are hit.
We can also remove the object that hit us from the game.
Old school games had three lives, so we’ll set this as the player health.
The player is the object in the game that needs to know its health, so this is where we will set the player health.
Open the player scene and the player script.
Go to the player.gd script

Insert a constant MAX_HEALTH and assign this the value of 3.
Then create a Variable health and assign this the MAX_HEALTH value.

We now have player health.
Taking Damage
Now our player needs to be able to take damage.
We will write a Function on the player script to handle this and detect if the player has died.
At the end of the player.gd script add two blank lines then write the Function declaration.

Now we Need to add the logic to taking damage add comments to Explain what should happen.
First, we subtract the value from the health and overwrite the value currently in health.
Then we check if the health is less than or equal to zero. If it is we go to the main menu.

Now we Need to change the code on our damage obstacle / item.
Open the damage script.

Replace line 16 with the following code which will run the take_damage Function. Give it a value of the amount of damage you want to inflict.
Make sure that the Function name matches exactly what you added into the player.

We also want the damage item to disappear once it has hit us.
Add the call to queue_free() onto the damage script
For this we use queue_free()

We can’t see our health yet, but we can test the level.
Make sure that you have at least three damage obstacles in the level.

Note that we can see all the items.

When I go over one it is removed from the scene.

If I go over another, I have lost all my health and the game goes to the main menu.

But this isn’t fun to play, it feels unfair as we don’t know what our health is.
Displaying Player Health
Open the player scene.
Switch to 2D view.
We are going to add an in game UI to the scene.

Add a Control node to the Player and rename it PlayerUI
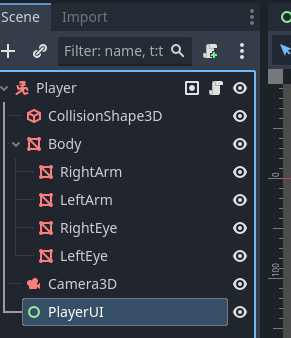
Change its anchor preset to Full Rect
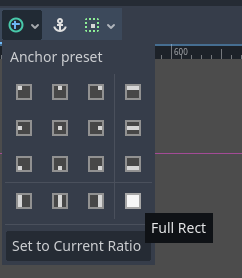
Add a label and progress bar to the scene.
Position them where you would like them in the game.
Run the game to trial out different positions.
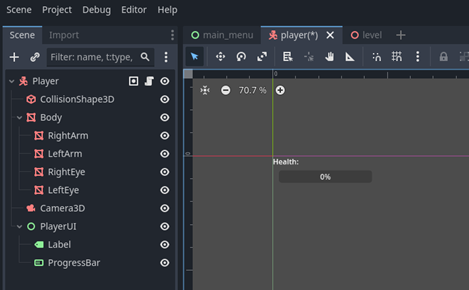

In the inspector for the ProgressBar disable percentage to remove showing the percentage on the bar.
In the inspector scroll down to Theme Overrides and then Styles.
Set Background and fill to appropriate colours.
Choose NewStyleBoxFlat


If you change the value for the progress bar you will see the bar change. You can also change the max value, we will be doing this with code later.


Now go back to the player script.
Before the _physics_process Function add a couple of extra lines.
Add a _ready() Function.

This Function runs as soon as the player is loaded and able to run.
We can use this Function to setup the player health and UI.
Add the code below to the _ready() Function.
We can use $ to access any nodes that are in the scene and are children of the node the script is attached to.
We Need to refer to them by the name that they are in the Scene Tree.
For example to access the ProgressBar we use $PlayerUI/ProgressBar.
To access properties or functions of these nodes we use dot (.) notation and then the name of the property of Function.
Search up each node in the Godot docs to find out what they do.
Here we change the max_value of the ProgressBar to the MAX_HEALTH of the player and then also change the value of the ProgressBar to the player health.
Finally, we update the text label. Note we have to use the str() Function to with the number stored in health into a String.


Now test your game.
The health initially displays correctly but doesn’t update.

Updating Player UI
Now we Need to update the player UI when we take damage.
Open the player.gd script and go to the take_damage Function.

Now when we change the health we want ot update the contents of the ProgressBar and Label.
This is the same as for the _ready() Function.
We could copy these lines of code and paste them again.

Like this:

But this means that we have duplicate code.
Let’s make a new Function called update_ui() and put the code there.

Now go to the take damage Function and add a call to the update_ui() Function.

We can also replace lines 16 and 17 with one line of code to call update_ui()

Test the game.
We can see that the UI now updates.
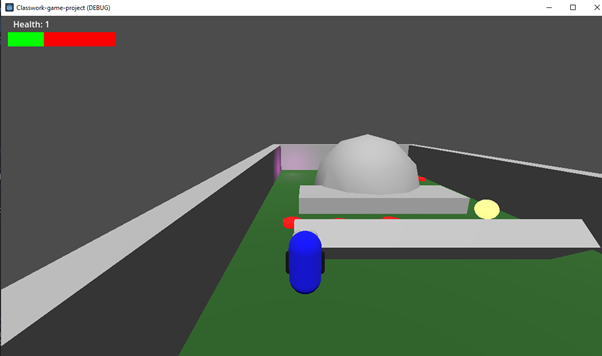
You can use this approach to make collectibles to track the score.
Adding Challenge Through Timers
Now we have a game where we can die bit it’s quite easy to complete.
An easy way to add difficulty is by including a timer to add to the challenge.
For example we could give the player 10 seconds to complete the level.
As the levels are going to determine the difficulty we will add the timers to the level.
If we were adding stamina we would add the timer to the player.
Add a Timer Node.
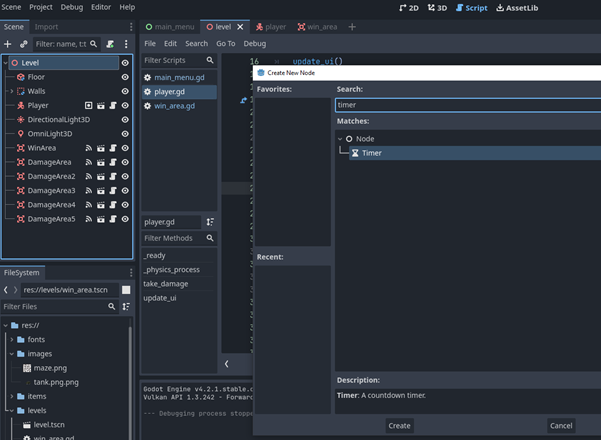
In the inspector set the timer to Autostart. Leave the Wait Time to 0.1s this will mean that the timer will Count each tenth of a second.

We Need to add a script to the Level.
Attach a script to the level. This will manage all of the level code.

Now go to the node panel and add timeout() signal.
Make sure to add the signal to the Level node (not the player).
On the level script add one Variable and one constant for the elapsed time in the level and the max time available.

Add a timeout() signal to the timer on the Level script

Add a label to the Level and position it where you want the game time to be.
You will see the PlayerUI as there is a player on the scene.

Test the scene to make sure the label loads (it won’t work yet).
Go to the _on_timer_timeout() and add the following code.
This will get the wait time from the timer and update the game elapsed time.

To modify this to Count down to zero use the following code

Test the scene. The timer should be working.

Now we Need to check if the time has expired.
In the time timeout check if the elapsed_time is greater than the MAX_TIME.

Rather than going to the main scene create a scene for when the player runs out of time with a restart button.
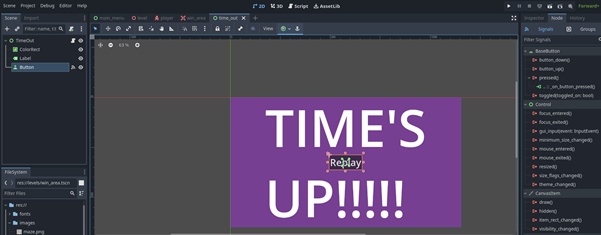

Link the time out to the scene.


Sometimes the numbers will not format as expected. Line 20 below shows how to force the decimal number to only display 2 whole numbers and 1 decimal.


Transferring Data Between Scenes – Global Autoloads
Now we will modify the game so that we can send information to other scenes.
We Need to create an autoload.
Make a new scene of type Node

Rename it GameManager

Save the file into a Globals folder.

Attach a script to the GameManager node.

Now we Need to add the GameManager to autoloads.
Go to Project then Project settings.

Click Autoload then the folder.

Select the GameManager scene.

Click Add.
We now have the GameManager set as a global scene.
We can access anything in it by writing GameManager. In any script.

In the GameManager script add two Variables end_time and end_health
We will use these to track the state of the player health and the time at the end of the game and then load these into the win scene.

Open the win area script

Before we load the winner scene we Need to store the player health and level time.
Player health is easy as we have the player body that has entered the win area.

Now go to the winner scene and script.

Add a new label to the Winner scene, this will be for the health.

Now go to the winner script and add code to update the health label to take the value from the GameManager.

Test the game. If you win the correct health value should be shown.

Using Signals to Send information between Scenes – Getting the Level Time
In order to send information to another scene we Need to use a signal.
We can create these in code.
Go to the Win_area.gd script.
Add signal game_won to the script as shown on line 3.
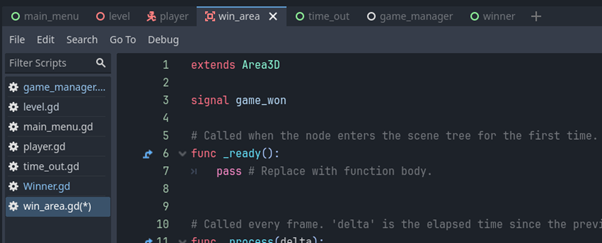
Then we Need to emit (send out) the signal.
This will happen when the player enters the win area.
Add the line of code shown on line 18 below.

Now go back to the level.
Add the game_won() signal to the level script.
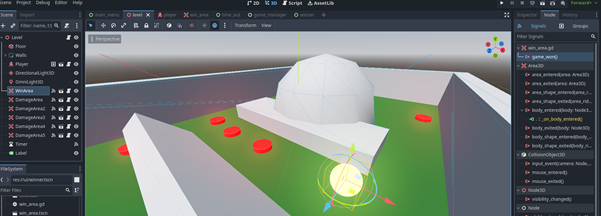

In the Function for the signal on the level script add code to store the time elapsed into the Variable in the GameManager.
This is shown on lines 26 and 27 below.

Now we can go back to the winner scene.
Add another label for Time.

Now we Need to edit the script again to update the remaining time label. This is the same as we did earlier for the health.
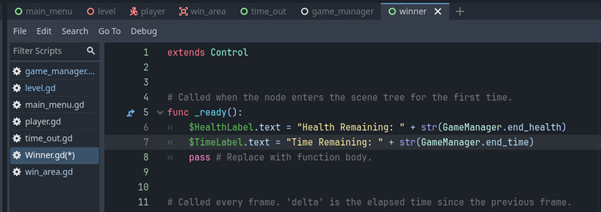
Test your game.

Custom Controls
We might want to add custom controls.
We can do this in Project settings and the Input Map.

Add instructions for movement below. We will link these to our code later. The names here are what we will Identify them by and aren’t the Inputs or keys we will press.
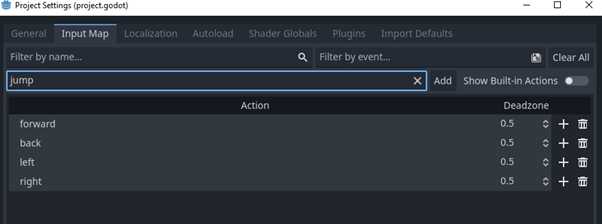
To assign keys to Inputs click the + next to the action.

You can then press the key to use or select it from the input.
Click Ok.

You can add multiple Inputs for each action.

Add all of your Inputs.

Now we Need to modify the Inputs that our code is reading in.
Go to the player script.
In the Function _physics_process the Inputs are being handled.
Input.is_action_just_pressed() is where it detects Inputs.
Change the following:
- ui_accept to jump
- ui_left to left
- ui_right to right
- ui_up to forward
- ui_down to back

Test your game with the new Inputs.
Moving the Camera with the Mouse
Getting the camera right in games is challenging. We often overlook how important the camera is.
Here we will look at some code and changes to the player scene to allow for a simple third person or first person camera.
Open your player scene in 3D view.

At the moment the camera is stuck behind the player.
Select the player node and add a Marker3D node.
Rename this node CameraPivot. We will use this as the point to rotate the camera from.

Move the CameraPivot to the position where you want the camera to swing around, usually somewhere inside the head of the player.

Now drag the camera so that it is a child of the CameraPivot node.

Now we Need to add code to Control the mouse movement.
Switch to the player.gd script
First add the Variable shown on line 10 to store the mouse sensitivity, you can change this to make the mouse movements more of less sensitive.
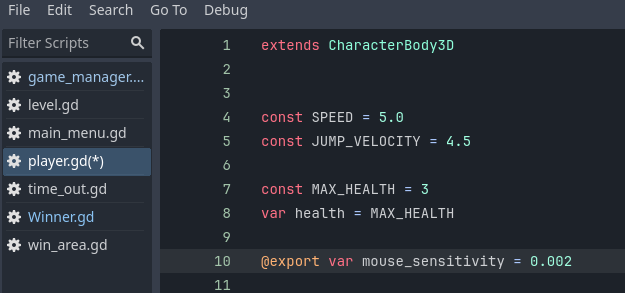
Now we Need to add code for tracking the mouse movement.
Under the ready Function add a new Function _input(Event) as shown on line 21 below.
We can now see the completed input Function on lines 21-25 below. Add these to your program.
Line 23 rotates the camera pivot around itself depending on how much you move the mouse left or right, this is why it takes the mouse x axis movement.
Line 24 rotates the camera up and down.
Line 25 applies a clamp to restrict the up and down rotation to 70 degrees. We Need to use the deg_to_rad Function to convert degrees into radians that the Function expects.

Test your game.

Switching to First Person
It is easy to change to first person mode.
Switch to the 3D view of the player scene.
Select the Camera3D node.
In the inspector set the position and rotation back to 0 for all options.

This will move the camera into the same position as the CameraPivot

Test your game, you now have a first person mode.
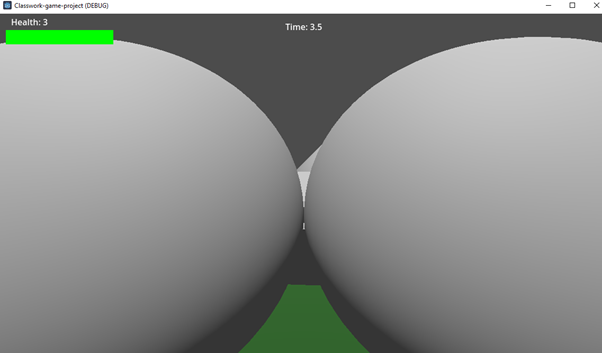
Note that we have an Issue that we can see the player eyes and they block our view.
To fix this we will stop the game rendering our player meshes.
In the SceneTree click the eye next to the Body mesh. This will make is invisible (as well as any child nodes)

When we test the game, it’s now working as expected.

Wrapping Up and Future Improvements
We now have a complete game with some challenges.
Think about how you could improve your game.
There are a lot of additional aspects that we have not covered here to make your game better. There will be later examples to demonstrate how to achieve this.
These improvements could be:
- Moving the Camera
- Animation
- Sounds
- Moving Enemies
- Shooting
- Sprinting
- Collectables