Building a web application with Flask, Python, and SQLite is an excellent way to understand how backend architectures interact with a relational database layer. This Guide walks you through building an interactive Order Management System capable of handling user creation, item inventory records, and relational order fulfillment.
Project Architecture & Setup
Before implementing any code, Construct the directory boilerplate below. This file distribution isolates logic configuration from the presentation layout layer templates.
flask_app/
│
├── app.py                 # Main Python/Flask application server logic
├── database.db            # SQLite database Data Binary (generated automatically)
└── templates/             # Front-end Jinja2 presentation layout directory
    ├── base.html          # Shell layout structure and global style rules
    ├── items.html         # Inventory logs views & creation interface
    ├── users.html         # User profiles directory setup page
    └── order.html         # Relational transactional ordering desk
Step 1: Environment Installation
Install the required dependencies via your command-line interface framework tool Environment:
pip install flaskor
Python -m pip install flaskStep 2: Designing the Database Schema
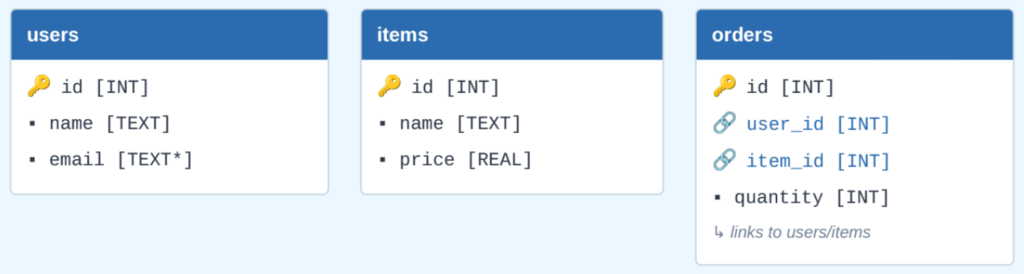
Our platform tracks structured information split dynamically into three modular tables: users, items, and orders. Because SQLite acts natively as a relational System, the orders table ties these tables cleanly using strict relational keys.
Entity Relationship Schema
Step 3: Creating Core Server Code (app.py)
Create the core executable program Environment inside app.py. This manages initialization, direct database queries, Context route manipulation, and parameters parsing Context flows.
import os
import sqlite3
from flask import Flask, flash, redirect, render_template, request, url_for

app = Flask(__name__)
app.secret_key = "super_secret_key"
DATABASE = "database.db"

def get_db_connection():
    conn = sqlite3.connect(DATABASE)
    conn.row_factory = sqlite3.Row
    return conn

def init_db():
    if not os.path.exists(DATABASE):
        conn = get_db_connection()
        cursor = conn.cursor()
        cursor.execute('''
            CREATE TABLE IF NOT EXISTS users (
                id INTEGER PRIMARY KEY AUTOINCREMENT,
                name TEXT NOT NULL,
                email TEXT NOT NULL UNIQUE
            )
        ''')
        cursor.execute('''
            CREATE TABLE IF NOT EXISTS items (
                id INTEGER PRIMARY KEY AUTOINCREMENT,
                name TEXT NOT NULL,
                price REAL NOT NULL
            )
        ''')
        cursor.execute('''
            CREATE TABLE IF NOT EXISTS orders (
                id INTEGER PRIMARY KEY AUTOINCREMENT,
                user_id INTEGER NOT NULL,
                item_id INTEGER NOT NULL,
                quantity INTEGER NOT NULL,
                FOREIGN KEY (user_id) REFERENCES users (id),
                FOREIGN KEY (item_id) REFERENCES items (id)
            )
        ''')
        conn.commit()
        conn.close()

init_db()

@app.route("/")
def index():
    return redirect(url_for('manage_items'))

@app.route("/users", methods=["GET", "POST"])
def manage_users():
    conn = get_db_connection()
    if request.method == "POST":
        name = request.form["name"]
        email = request.form["email"]
        try:
            conn.execute("INSERT INTO users (name, email) VALUES (?, ?)", (name, email))
            conn.commit()
            flash("User added successfully!", "success")
        except sqlite3.IntegrityError:
            flash("Email system conflict: Address profile already exists!", "error")
        return redirect(url_for('manage_users'))
    users = conn.execute("SELECT * FROM users").fetchall()
    conn.close()
    return render_template("users.html", users=users)

@app.route("/items", methods=["GET", "POST"])
def manage_items():
    conn = get_db_connection()
    if request.method == "POST":
        name = request.form["name"]
        price = request.form["price"]
        conn.execute("INSERT INTO items (name, price) VALUES (?, ?)", (name, price))
        conn.commit()
        flash("Item registered into inventory metrics cleanly!", "success")
        return redirect(url_for('manage_items'))
    items = conn.execute("SELECT * FROM items").fetchall()
    conn.close()
    return render_template("items.html", items=items)

@app.route("/order", methods=["GET", "POST"])
def place_order():
    conn = get_db_connection()
    if request.method == "POST":
        user_id = request.form["user_id"]
        item_id = request.form["item_id"]
        quantity = request.form["quantity"]
        conn.execute("INSERT INTO orders (user_id, item_id, quantity) VALUES (?, ?, ?)",
                     (user_id, item_id, quantity))
        conn.commit()
        flash("Transaction parsed and order logged safely!", "success")
        return redirect(URL_for('place_order'))

    users = conn.execute("SELECT * FROM users").fetchall()
    items = conn.execute("SELECT * FROM items").fetchall()
    Query = """
        SELECT orders.id, users.name AS user_name, items.name AS item_name,
               items.price, orders.quantity, (items.price * orders.quantity) AS total
        FROM orders
        JOIN users ON orders.user_id = users.id
        JOIN items ON orders.item_id = items.id
    """
    orders = conn.execute(Query).fetchall()
    conn.close()
    return render_template("order.html", users=users, items=items, orders=orders)

if __name__ == "__main__":
    app.run(debug=True)
Step 4: Designing Frontend Layout Interfaces Templates
Create individual document items configuration environments within the templates/ subdirectory. Flask coordinates layout construction logic utilizing built-in Jinja2 Component inheritance mechanisms.
1. templates/base.html (Universal Framework Layout)
<!DOCTYPE html>
<html lang="en">
<head>
    <meta charset="UTF-8">
    <title>Store Inventory System Control Management</title>
    <style>
        body { font-family: sans-serif; margin: 40px; background-color: #f4f4f9; }
        nav { margin-bottom: 20px; padding: 12px; background: #2b6cb0; border-radius: 4px; }
        nav a { color: white; margin-right: 20px; text-decoration: none; font-weight: bold; }
        table { border-collapse: collapse; width: 100%; margin-top: 20px; background: white; }
        th, td { border: 1px solid #e2e8f0; padding: 12px; text-align: left; }
    </style>
</head>
<body>
    <nav>
        <a href="/items">📦 Items Catalog</a>
        <a href="/users">👥 User Profiles</a>
        <a href="/order">🛒 Order Fulfillment</a>
    </nav>
    {% block content %} {% endblock %}
</body>
</html>
2. templates/items.html (Inventory Management Screen)
{% extends 'base.html' %}
{% block content %}
<h2>Manage Inventory Items</h2>
<form method="POST">
    <h3>Add New Catalog Item</h3>
    <input type="text" name="name" placeholder="Product Name" required>
    <input type="number" step="0.01" name="price" placeholder="Price" required>
    <button type="submit">Add Item Entry</button>
</form>
{% endblock %}
3. templates/users.html (User Database Registry Sheet)
{% extends 'base.html' %}
{% block content %}
<h2>Manage Accounts Directory</h2>
<form method="POST">
    <h3>Create User Account</h3>
    <input type="text" name="name" placeholder="John Doe" required>
    <input type="email" name="email" placeholder="john@example.com" required>
    <button type="submit">Register User Profile</button>
</form>
{% endblock %}
4. templates/order.html (Order Desk Execution Portal)
{% extends 'base.html' %}
{% block content %}
<h2>Transactional Order Entry Desk</h2>
<form method="POST">
    <select name="user_id" required>...</select>
    <select name="item_id" required>...</select>
    <input type="number" name="quantity" min="1" value="1" required>
    <button type="submit">Submit & Finalize Purchase Order</button>
</form>
{% endblock %}
Step 5: Running the Web Application
Launch the program.
Python app.pyOnce initialization tasks finalize successfully, open your local web browser tool parameters engine and redirect requests pathing to: http://127.0.0.1:5000/.
Testing Workflow Verification Routine:
- Open the User Profiles dashboard page view tab block Component and inject test customer datasets.
- Open the Items Catalog module tab frame and populate multiple structural product item profiles.
- Open the Order Fulfillment execution desk screen workspace, map a customer element target option Row to a specific catalog piece selection index variant option, select volume quantity values, and process validation checks