UI Buttons to Spawn and Despawn Objects (Grid Layout)
Download the example here.
This example builds on from the spawn and despawn prefabs in the scene tutorial. This tutorial will add a set of UI buttons that will allow you to select a prefab to spawn.
The grid layout component is used to align the buttons.
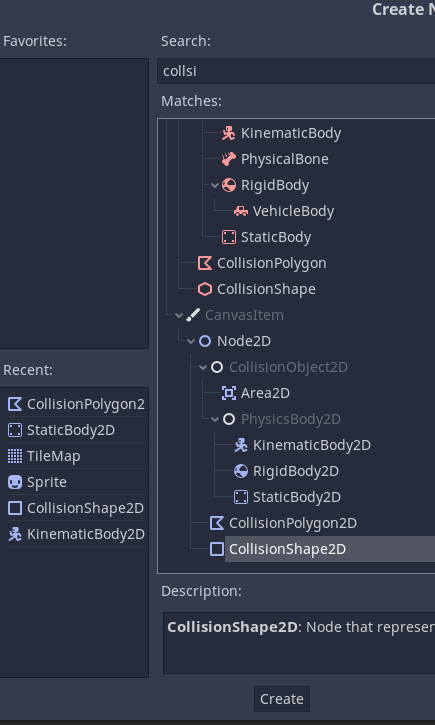
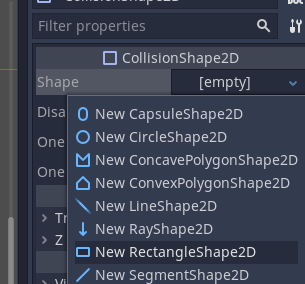
Create the prefabs you want to use for this object. You will also need images of each of the prefabs to assign to the buttons unless you want to use text.
You can download the prefabs and images here.
Assign the Player tag (or another tag of your choice to the prefabs you wish to use.
Create a scene with a set of terrain or objects on it.
Create a Canvas
Select the EventSystem GameObject.
In the inspector click the button Replace with Input System...
This will allow the Input system to work with the UI.
Select the Canvas.
In the inspector change the canvas scaler component properties to Scale with Screen Size. This means that no matter what resolution the screen is it will scale the UI.
Also change the reference resolution (default resolution). 1920 x 1080 is standard HD and a good resolution for applications that are being developed for computers.
Add a panel to the Canvas.
Change the background of the panel.
Resize the panel.


Change the anchor position of the panel to the bottom of the screen.
Change the rect transform pos Y to 0 and the anchor Y to 0.


Add the Grid Layout Group component to the panel.
This is used to help set out the components on the UI.

Adjust the cell size and spacing to a suitable size.
Changing the child alignment will determine the horizontal and vertical alignment of the objects in the grid layout.

Add four buttons to the panel.


Delete the text component from each button and rename them.

![]()
Drag the appropriate images onto each button to use an image instead of text.

This is done by dragging the image sprite onto the Source Image component.


Now we need to add our script.
You can use the existing script from the Spawn And Despawn Prefabs lesson.
This code is shown below.
using System.Collections;
using System.Collections.Generic;
using UnityEngine;
// 1. Import InputSystem
using UnityEngine.InputSystem;

public class SpawnAndDespawnItemWithUI : MonoBehaviour
{
   // 2. Add Input actions (requires Generate C# script checked)
   private MouseControlsPointAndClick _controls;
   // 3. list of prefabs to be able to spawn (placeholder for later task)
   public GameObject[] prefabs = new GameObject[4]; //Prefabs to spawn
   // 4. List to store spawned gameobjects to be able to manage them.
   public List<GameObject> spawnedItems = new List<GameObject>();

   // 5. Currently selected prefab from list. Only default in this example
   public int selectedPrefab = 0;

   // Start is called before the first frame update
   void Start()
   {
      // 7. Create new input actions using the C# script
      _controls = new MouseControlsPointAndClick();
      // 8. Enable / turn on the MouseRTS action map
      _controls.MouseRTS.Enable();
      // 9. When the PrimaryAction binding is performed call the PrimaryPerformed function
      _controls.MouseRTS.PrimaryAction.performed += PrimaryPerformed;
      /* 10.
      When the PrimaryAction binding is released call the PrimaryCancelled function
      Not used in this example
      */
      _controls.MouseRTS.PrimaryAction.performed += PrimaryCancelled;
      // 11. Right mouse button pressed
      _controls.MouseRTS.SecondaryAction.performed += SecondaryPerformed;
      // 12. Right mouse button cancelled / released (not used)
      _controls.MouseRTS.SecondaryAction.canceled += SecondaryCancelled;
   }

   /* 13.
   Primary button pressed. When left mouse pressed do this.
   Get the context of the button (what happened)
   This will cast a ray from the mouse position and see what it hits.
   */
   void PrimaryPerformed(InputAction.CallbackContext context) {
      // 15. Store the raycast hit result
      RaycastHit hit;
      // 16. Create a ray from the current mouse position through the screen towards the scene
      Ray ray = Camera.main.ScreenPointToRay(Mouse.current.position.ReadValue());
      /* 17.
      Cast the ray using the physics engine and see what it hits.
      Store what it (output) hits in the hit variable created earlier
      */
      if (Physics.Raycast(ray, out hit))
      {
         // 18. We are here because the raycast hit something Check if hit UI

		/* 19.
         This is a messy check for the if statement.
         There are two main checks carried out.
         First we need to see if the parent of the hit object does not exist (e.g. hit null)
         Or check that the object it hit was not one of the objects tagged with
         player that we have spawned (otherwise we can spawn objects on top of each other)
         */
         if(hit.collider.transform.parent == null || hit.collider.transform.parent.CompareTag("Player") == false) {
            /* 20.
            If we pass this instantiate (create) the object at the point the we hit
            the terrain (or other object)
            We use Quarternion.identiy to spawn it at the world space.
            */
            GameObject go = Instantiate(prefabs[selectedPrefab], hit.point, Quaternion.identity);
            // 21. Update the name of the prefab instance
            go.name += " _instantiated";
            // 22. Add it to the spawned items list.
            spawnedItems.Add(go);
         }

      }
   }

   // 14. Primary button released not used in this example.
   void PrimaryCancelled(InputAction.CallbackContext context) {

   }

   /* 23.
   Now we want to despawn the item when we right click on it
   */
   void SecondaryPerformed(InputAction.CallbackContext context) {
      // 23. We run the same kind of checks as before but this runs when we right click
      RaycastHit hit;
      Ray ray = Camera.main.ScreenPointToRay(Mouse.current.position.ReadValue());
      if (Physics.Raycast(ray, out hit))
      {
         /* 24.
         Check if we hit the parent gameobject with the tag Player.
         */
         if(hit.collider.transform.parent != null && hit.collider.transform.parent.CompareTag("Player")) {
               // 25. If so remove the gameobject from the spawnedItems list
               spawnedItems.Remove(hit.transform.parent.gameObject);
               // 26. Then destroy the object to free up memory and remove it from the scene.
               Destroy(hit.transform.parent.gameObject);
         }
      }
   }

   // 27. Not used in this example
   void SecondaryCancelled(InputAction.CallbackContext context) {

   }
}
Add an empty GameObject if it doesn't already exist.
Add a Player Input component to the GameObject
Add input actions form the previous lessons. Make sure that there is one for a left mouse click called PrimaryAction and one for a right mouse click called SecondaryAction. In this example that are part of a Action Map called MouseRTS.
Drag the prefabs into the prefabs array on the script. These are in the order that the buttons are.

Test the scene. The buttons won't work yet.
The code will spawn objects on the UI as well. We want to get it to ignore these button presses.
Open the script.
Add points 28-32 as shown in the code below.
- Creates a layermask variable which will be used to ignore spawn clicks made on the UI elements.
- Inside the RayCast hit code in the PrimaryPerformed function we add an if statement that encloses points 19-22
This line of code will check if the object that was hit was not on the UI layer. If it is not on the UI layer we run the spawn code. - This is the closing bracket for the if statement for point 29
- Here we create a function which will be run when the button is clicked. It takes an argument which is the index of the prefab array. This is called PrefabSelector
- We assign the index to the selectedPrefab
using System.Collections;
using System.Collections.Generic;
using UnityEngine;
// 1. Import InputSystem
using UnityEngine.InputSystem;

public class SpawnAndDespawnItemWithUI : MonoBehaviour
{
   // 2. Add Input actions (requires Generate C# script checked)
   private MouseControlsPointAndClick _controls;
   // 3. list of prefabs to be able to spawn (placeholder for later task)
   public GameObject[] prefabs = new GameObject[4]; //Prefabs to spawn
   // 4. List to store spawned gameobjects to be able to manage them.
   public List<GameObject> spawnedItems = new List<GameObject>();

   // 5. Currently selected prefab from list. Only default in this example
   public int selectedPrefab = 0;

   // 28. Layermask to ignore the UI being clicked on (UI is layer 5 by default)
   public LayerMask ignoreLayerMask;

   // Start is called before the first frame update
   void Start()
   {
      // 7. Create new input actions using the C# script
      _controls = new MouseControlsPointAndClick();
      // 8. Enable / turn on the MouseRTS action map
      _controls.MouseRTS.Enable();
      // 9. When the PrimaryAction binding is performed call the PrimaryPerformed function
      _controls.MouseRTS.PrimaryAction.performed += PrimaryPerformed;
      /* 10.
      When the PrimaryAction binding is released call the PrimaryCancelled function
      Not used in this example
      */
      _controls.MouseRTS.PrimaryAction.performed += PrimaryCancelled;
      // 11. Right mouse button pressed
      _controls.MouseRTS.SecondaryAction.performed += SecondaryPerformed;
      // 12. Right mouse button cancelled / released (not used)
      _controls.MouseRTS.SecondaryAction.canceled += SecondaryCancelled;
   }

   /* 13.
   Primary button pressed. When left mouse pressed do this.
   Get the context of the button (what happened)
   This will cast a ray from the mouse position and see what it hits.
   */
   void PrimaryPerformed(InputAction.CallbackContext context) {
      // 15. Store the raycast hit result
      RaycastHit hit;
      // 16. Create a ray from the current mouse position through the screen towards the scene
      Ray ray = Camera.main.ScreenPointToRay(Mouse.current.position.ReadValue());
      /* 17.
      Cast the ray using the physics engine and see what it hits.
      Store what it (output) hits in the hit variable created earlier
      */
      if (Physics.Raycast(ray, out hit))
      {
         // 18. We are here because the raycast hit something Check if hit UI

         // 29. Check if the user clicked on a UI element
         if(hit.collider.gameObject.layer != ignoreLayerMask.value) {

            /* 19.
            This is a messy check for the if statement.
            There are two main checks carried out.
            First we need to see if the parent of the hit object does not exist (e.g. hit null)
            Or check that the object it hit was not one of the objects tagged with
            player that we have spawned (otherwise we can spawn objects on top of each other)
            */
            if(hit.collider.transform.parent == null || hit.collider.transform.parent.CompareTag("Player") == false) {
               /* 20.
               If we pass this instantiate (create) the object at the point the we hit
               the terrain (or other object)
               We use Quarternion.identiy to spawn it at the world space.
               */
               GameObject go = Instantiate(prefabs[selectedPrefab], hit.point, Quaternion.identity);
               // 21. Update the name of the prefab instance
               go.name += " _instantiated";
               // 22. Add it to the spawned items list.
               spawnedItems.Add(go);
            }
         }
      }
   }

   // 14. Primary button released not used in this example.
   void PrimaryCancelled(InputAction.CallbackContext context) {

   }

   /* 23.
   Now we want to despawn the item when we right click on it
   */
   void SecondaryPerformed(InputAction.CallbackContext context) {
      // 23. We run the same kind of checks as before but this runs when we right click
      RaycastHit hit;
      Ray ray = Camera.main.ScreenPointToRay(Mouse.current.position.ReadValue());
      if (Physics.Raycast(ray, out hit))
      {
         /* 24.
         Check if we hit the parent gameobject with the tag Player.
         */
         if(hit.collider.transform.parent != null && hit.collider.transform.parent.CompareTag("Player")) {
               // 25. If so remove the gameobject from the spawnedItems list
               spawnedItems.Remove(hit.transform.parent.gameObject);
               // 26. Then destroy the object to free up memory and remove it from the scene.
               Destroy(hit.transform.parent.gameObject);
         }
      }
   }

   // 27. Not used in this example
   void SecondaryCancelled(InputAction.CallbackContext context) {

   }

   // 30. Method to use on the button click to set selected prefab
   public void PrefabSelector(int index) {
      // 31. Set the selected prefab
      selectedPrefab = index;
   }
}
Return to Unity.
Set the Ignore Layer Mask variable to UI
Now we need to link up the buttons.
Click the + in the On Click () button component.
Drag the UIManager onto the On Click ()
In the function drop down select the script SpawnAndDespawnItemWithUI and then the PrefabSelector function that we created.
Note that you can select multiple buttons to add the functions at the same time.
Next change the variable / index to match the prefab position in the array.
In this example 0 will be sphere, 1 cylinder, 2 cube, and 3 capsule.
Save and test the scene.
You have now created a set of buttons that interact with the scene.